

Image Scaling with Bresenham - Errata
An algorithm to quickly scale images with a quality that approximates that of linear interpolation (but without the costs) appeared in Dr. Dobb's Journal (issue 336, May 2002). You need that article for this addendum to make any sense.
1. Erroneous statement about IntPart being zero
In the article, I wrote:
When enlarging a picture, IntPart is always zero, and when shrinking an image, IntPart is only non-zero when shrinking to less than half the original size. [...] (These observations are useful when you restrict the zoom range used with the smooth Bresenham algorithm.)
There are two things wrong about this snippet. First of all, the second part of the first sentence is incorrect: when shrinking an image, IntPart is 1 (one) until the image is shrunk to half the original size or less. This error escaped my attention when proofreading the manuscript and the galleys.
Secondly, these phrases fail to make clear why one should bother with such a detail —it does not explain the optimization opportunity that I intended to bring forward. What the sentences should have said, is:
When enlarging a picture, IntPart is always zero, and when shrinking a picture, IntPart is one (1) until shrinking to half the original size or less. [...] When you combine smooth Bresenham with MIP-mapping, the zoom factor is bound to the range [0.66 ... 1.5]. This gives an opportunity for optimizing the routine, by splitting the resize algorithm in two specialized versions: one for enlarging (up to a factor 1.5) and one for reducing (down to a factor 0.66). The IntPart variable becomes redundant in both routines. Removing a variable in the inner loop of a routine (plus all operations on that variable) typically leads to increased performance.
2. Erroneous statement about the suitable zoom factor range
In the article, I wrote:
The quality of the smooth Bresenham scaling algorithm quickly deteriorates when the zoom factor drops below 2/3 or raises beyond 2. [...] Outside that range, some pixels quite noticeably get dropped or replicated.
The lower bound is actually a bit lower: 1/2 instead of 2/3. The quote also does not make clear that the lower and upper bounds are excluded. If you zoom to exactly twice the original size, every pixel gets replicated; if you zoom to exactly half the size, every other pixel gets dropped.
3. The images that compare smooth Bresenham to other interpolators
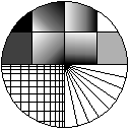
Figures 1 and 2 in the printed article are too small to show the difference in quality between smooth Bresenham, nearest neighbour, bilinear interpolation and bicubic interpolation. To remedy that, the original pictures are below. For completeness, I also show figure 3 (to better support my statement that bicubic interpolation as done by Photoshop has an implicit sharpening artefact).
 Original picture |
|||
 75% - Smooth Bresenham |
 75% - Nearest Neighbour |
 75% - Bilinear interpolation |
 75% - Bicubic interpolation |
 150% - Smooth Bresenham |
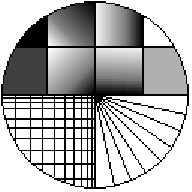 150% - Nearest Neighbour |
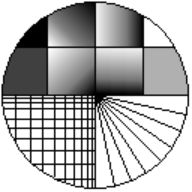 150% - Bilinear interpolation |
 150% - Bicubic interpolation |
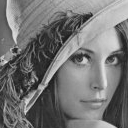 Original picture |
|||
 75% - Smooth Bresenham |
 75% - Nearest Neighbour |
 75% - Bilinear interpolation |
 75% - Bicubic interpolation |
 150% - Smooth Bresenham |
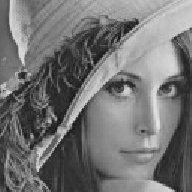 150% - Nearest Neighbour |
 150% - Bilinear interpolation |
 150% - Bicubic interpolation |
Original picture |
 Scaled to 102% - Bicubic interpolation |
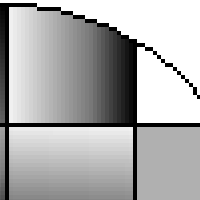 Original picture, zoomed by 400% |
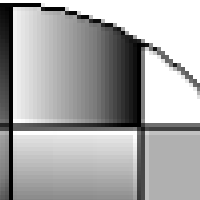 Scaled to 102% - Bicubic interpolation, zoomed by 400% |
4. Selecting a value for the "averaging criterion"
In the article, I made the following remark:
For small scaling factors, the interpolating filters cause the output picture to be blurred. [...] For these small scaling factors, one can reduce the blurring effect by "snapping" the target pixel to the nearest source pixel if it is "close enough", and interpolating it otherwise. A blend between nearest neighbour and interpolation, so to speak. With the smooth Bresenham algorithm, you achieve this by altering the midpoint criterion. In the ScaleLineAvg() function, figure 2, the local variable Mid is set to TgtWidth / 2; increasing its value makes the target pixels snap earlier to source pixels (when Mid exceeds the value of TgtWidth, smooth Bresenham reduces to nearest neighbour).
In practice, especially for colour pictures, I have found that selecting a good value for Mid is essential for the produced output. At first I used a few ad hoc heuristics to find a decent value for Mid, somewhere between TgtWidth / 2 and TgtWidth. After a few experiments I settled for a pair of simple relations between the value of Mid and the scale factor.
The general idea is to average every other pixel when half of the source pixels is mapped to at least two target pixels or vice versa, and to get a one-to-one mapping when the source and target sizes are equal. Between these extremes, the Mid value is a simple interpolation, as in the figure below:
Perhaps this mapping gets to the other extreme: snapping pixels to non-averaged values too eagerly. This can be adjusted by choosing a higher "slope" factors than the factors "3/2" and "1" in the equations (below) for expanding and reducing respectively (I think that these factors are minimum, you should not choose lower factors).
4.1. When expanding (TgtWidth > SrcWidth)
Mid = TgtWidth -
3
2
(TgtWidth - SrcWidth)
|
I clamp the lower bound of the value of Mid to TgtWidth / 2. The upper bound is guaranteed to be TgtWidth.
4.2. When reducing (TgtWidth < SrcWidth)
Mid = TgtWidth + 1 · (TgtWidth - SrcWidth)
Note that (TgtWidth - SrcWidth) is negative when reducing. Again, I clamp the lower bound of the value of Mid to TgtWidth / 2. The upper bound is guaranteed to be TgtWidth.
5. Calculating colour averages efficiently
Much of the position that smooth Bresenham couples reasonable quality to high performance centres around being able to efficiently calculate the (unweighted) average of two colours. The article completely skirts this crucial issue (to my defence, I did include a sidebar discussing this topic in the manuscript that I sent to Dr. Dobb's Journal). This omision is corrected in a separate on-line paper: "Quick colour averaging".