

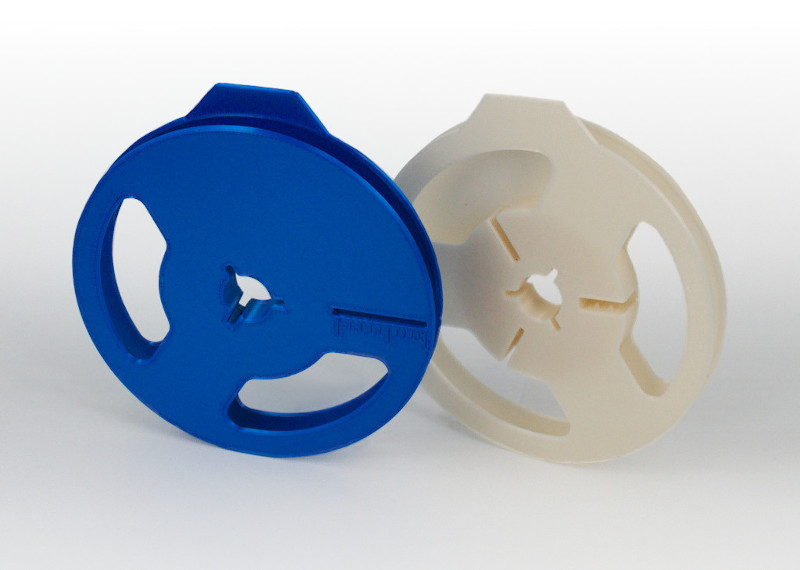
Mini-reel for SMD components
The mini-reel is a reel for SMD components on cut tape. It is compatible with the standard 7" reels, only smaller. Its capacity is therefore also much smaller: about 1/4th of what a 7" reel can hold. Novelties of the mini-reel design (apart from its smaller size) are: a slot with a scale for estimating the quantity left on the reel, a rim at the inside of the outer edge that avoids “spontaneous” unrolling of the tape from the reel, sprocket pins to anchor the end of the tape, and a tab for an extra (small) label. All these options are configurable and… well, optional.
Ready-to-print files for three common tape widths are in the Downloads section. The design file, in OpenSCAD is also included.
-
-

-
-

scale detail
-
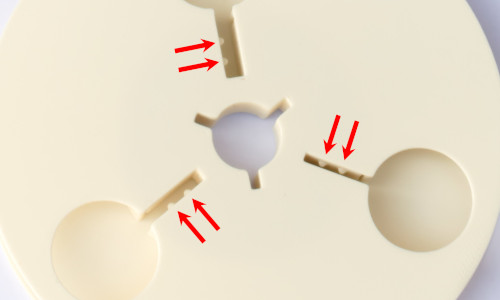
sprocket pins detail
Design
Most importantly, the design follows the standard for reels for the essential dimensions (EIA-481). The mini-reels that were once on the market had a diameter of 100mm, and this design inherits that size.
That said, the mini-reel is designed in OpenSCAD and all dimensions can be configured (with the OpenSCAD “Customizer”). You could even use this design file to generate standard 7" reels.
The suggested (and preset) dimensions of the mini-reel are: outer diameter = 100mm (nearly 4"), hub diameter = 50mm, spindle diameter = 13mm (the spindle is also called the “arbour”). There are presets for tape widths of 8mm, 12mm and 16mm. In the default settings, the “wall thickness” of the flanges is 1.2mm, and the flanges are separated by the tape width plus 0.4mm tolerance. The total thickness of a mini-reel is therefore the tape width plus 2.8mm (but again, all these values can be changed).

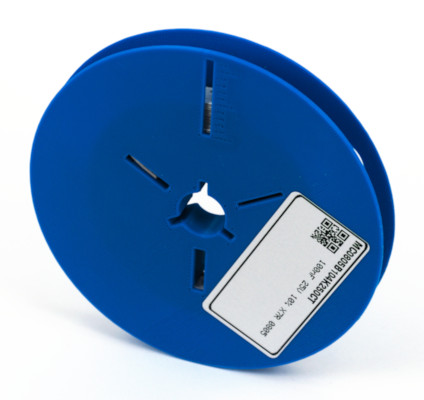
The mini-reel is printed in two parts, which are then snapped together (no glue is needed). The “bottom” side has three holes, the “top” side has only two. The larger surface on the top side is where you would put a label with the part information.
The hub has three slots have varying widths, and this is because cut tape has varying thicknesses. The narrowest slot that the tape still fits in, typically holds the tape best.
Options
All options can be disabled or configured in the OpenSCAD script. The options are extensions to the standard features.
Slot with scale markers —to help estimating quantity on a reel
The top side optionally has a slot that runs from the hub to the edge, with a scale next to it. Its purpose is to allow you to estimate the amount of components left on the reel —more on this in the next section.

Sprocket pins —to keep the tape from slipping out of the slot
Another optional feature is the addition of “sprocket pins” in the slots where the end of the tape is inserted (see the picture below). These pins fit into the sprocket holes of the cut tape. The goal is that these avoid the tape of sliding out too easily due to the stiffness of the paper tape and its tendency of unrolling. Yet, when the tape is at its end and the mini-reel is fully unrolled, that last bit of tape should slide out of the slot with ease.

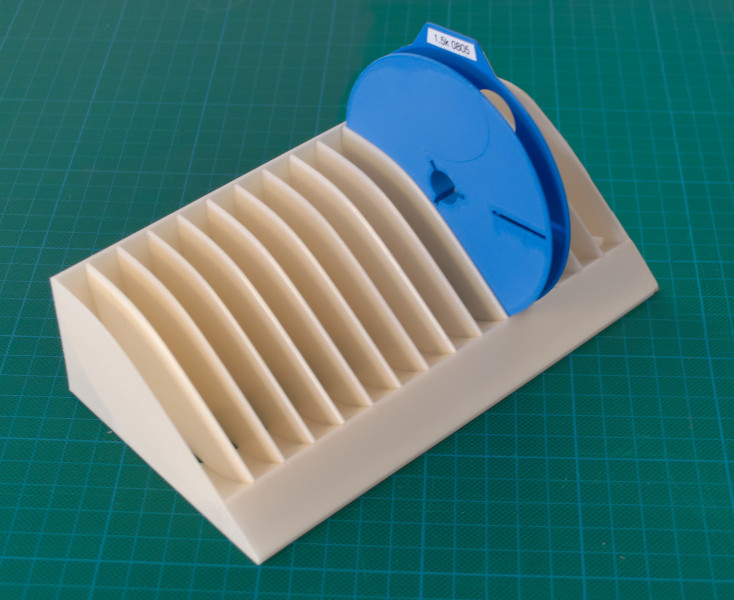
Edge tab —for quickly locating the correct reel in its storage
One of the flanges can have a “tab” for a small label. When reels are stored in a tray, you can only see the main label of the reel on the front —see the left frame of the image below. With an extra (abbreviated) label on the TAB, you can quickly browse through all reels in a tray, to find the correct one —in the right frame of the picture, it is easy to spot that behind the front-most reel with “MIC5504-3.3” regulators, is a reel with 22pF capacitors (in “0603” package), and behind that one is a reel with 1.5kΩ resistors.

Printing and assembly
I recommend that the parts are printed on a smooth surface (so not a “powder-coated” steel sheet; the satin-coated sheet works great-though). You will want the top side of the reel to be smooth for the label to stick well.
The pins for the sprocket holes are essentially “perimeter bridges”. So I recommend PLA, which bridges well. (You can also disable the pins in the OpenSCAD customizer.) A brim or supports are not needed.
A mini-reel consists of two parts, which you can simply clip together. No glue is needed. There are three pins on the top half and three corresponding holes in the bottom half, which keep the halves aligned. These pins are positioned such that the halves will only snap together in one specific orientation (relative to each other). So if the parts won't snap, check whether you have correctly matched the pins to the holes.
Estimating the quantity left on a reel
Especially when a reel holds a small quantity of components, you will want to know whether there is enough for the batch at hand. And a mini-reel holds a small quantity almost by definition.
The most accurate estimate is when using a Reel Quantity Calculator. For the mini-reel, set the hub diameter to 50 in this calculator, and the “material thickness” to 0 (zero). You can accurately measure the “roll width” (the R-value in the calculator) with calipers through the slot with the scale and you need to measure the thickness of the tape with calipers as well. Note that the estimate is only accurate if the tape is tightly wound on the reel.
For a rough estimate, you do not need calipers or a calculator. The scale of the mini-reel has 10 markings, each of which represents a 10% step in quantity of a full reel. Near the edge, the markings are more closely spaced than near the hub, to compensate for the smaller diameter near the hub.
So the position on the scale is the percentage of the quantity of a full reel. Next question: how many components fit on a full mini-reel. This depends on the thickness of the tape. The graph below gives the full-reel quantities for mini-reels with the standard design parameters, as in the downloads. Each curve in the graph pertains to the pitch with which the components are spaced in the tape.


The gauge at the right of the graph avoids that you need to actually measure the tape thickness at all. With this gauge (for the model, see the downloads, below), you test which slot is the best fit for the tape. The value next to the slot gives you the quantity of a full mini-reel. For example, the best fitting slot may have the label “1400” —then, if you look at the scale of the mini-reel itself and estimate that it is roughly at its 60% marking, a quick calculation will result in an estimated 840 components remaining.
The gauge assumes that the components are at a 4 mm pitch. When components are spaced at 8 mm in the tape, you need to divide the value by two, and when the components are spaced at 2 mm, you need to multiply them by two.
As said, these are estimates, and the easier estimates are less precise than the more involved one. For best precision, measure the tape thickness with calipers and use the Reel Quantity Calculator.
Rationale
At the turn of the century, when SMD components were not as ubiquitous as they are today, you could get parts in a quantity of 1000 on a mini-reel. It made sense, especially for prototyping and for the smaller manufacturing services: you could often not re-use left-over parts of one project in another, because SMD parts were still special. So for a small series, you would rather buy mini-reels instead of standard 7" reels (that hold 4000 or 5000 parts).
This changed as SMD parts became more and more common. Sales of 7" reels increased and those of mini-reels decreased, up to the point that part manufacturers decided that mini-reels were no longer commercially viable. Mini-reels all but disappeared from the market.
While mini-reels may not be commercially viable, there is still a use-case for them. The fact that several distributors offer a “re-reeling service” proves that there is still a market for smaller quantities —but yet on a reel.
When it comes to storage, small reels take less space than large ones. That, in a nutshell, is my rationale for the mini-reel. For a small company, with a small stockroom, but still a large selection of different components, all those barely filled 7" reels are a waste of space. The scale for estimating the component quantity left on the reel is a nice bonus.
Tray for the mini-reel
Now that “storage” has been mentioned a few times: we also made a design for a tray for the mini-reels. Like the mini-reels, the design is in OpenSCAD, and all dimensions are configurable with the “customizer” of OpenSCAD.

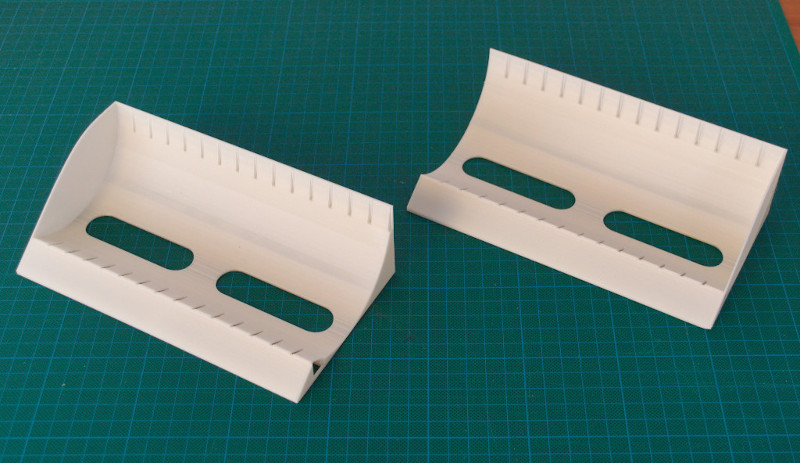
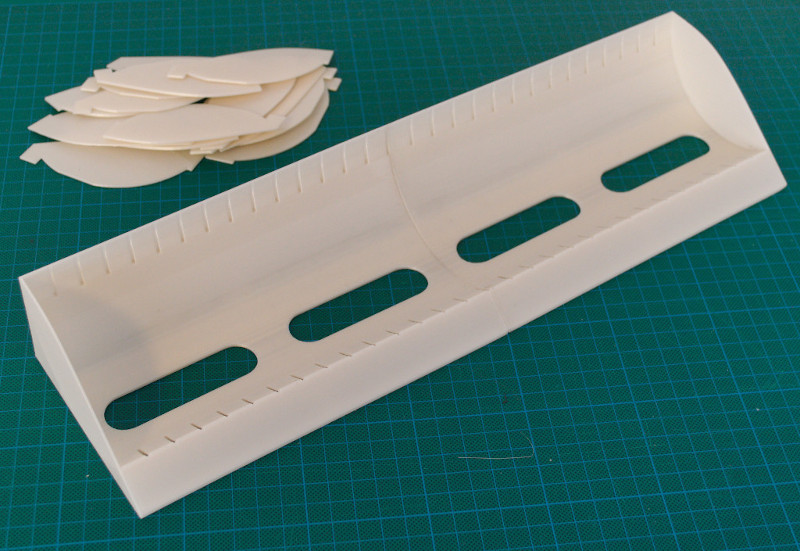
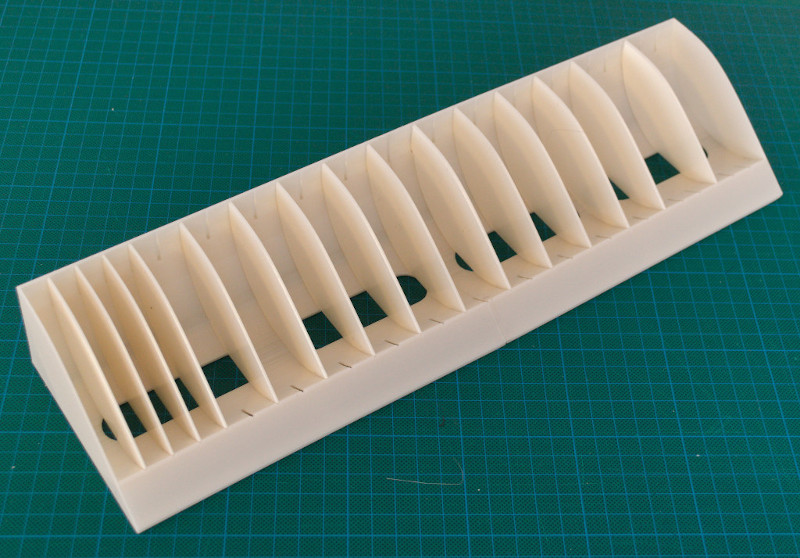
The tray has plug-in dividers that you can put at various positions. This makes the tray suitable and easily adjustable for reels of different widths.
The ready-to-print STL files have a length of 190mm. Next to a self-contained tray with end panels on both ends, there are also trays where the panel is missing on either end. This allows you to make a tray of 380mm long, by gluing a pair of these “half”-trays together. All these variants are generated from the same OpenSCAD file; you can even omit the end panels on both sides (for even longer trays).
Downloads
| Mini-reel for 8mm tape (no tab), STL file | |  |
| Mini-reel for 12mm tape (no tab), STL file | | |
| Mini-reel for 16mm tape (no tab), STL file | | |
| Mini-reel for 8mm tape, with tab for a label, STL file | | |
| Mini-reel for 12mm tape, with tab for a label, STL file | | |
| Mini-reel for 16mm tape, with tab for a label, STL file | | |
| Mini-reel gauge, STL file | | |
| Design file for the mini-reel | OpenSCAD | |
| Mini-reel Tray (closed on both ends), STL file | | |
| Mini-reel Tray (closed on left side), STL file | | |
| Mini-reel Tray (closed on right side), STL file | | |
| Divider panel for mini-reel, STL file | | |
| Design file for the mini-reel tray | OpenSCAD | |
For the mini-reels, I recommend that the parts are printed on a smooth surface (so not a “textured” steel sheet). You will want the top surface of the reel to be smooth for the label to stick well.
Supports or a brim are not needed.
Links
| OpenSCAD | www.openscad.org |
Alternatives
When starting my design, I was aware of a similar mini-reel design on Thingiverse. After the fact, I also stumbled upon another, even smaller design, also on Thingiverse. Neither design appears to be parameterizable; they are both for 8mm "paper-tape" style cut tape. I wanted a configurable design, both to support several tape widths (at least 8mm and 12mm tape), and to support various tape thicknesses (embossed carrier tape is usually thicker than paper carrier tape).
Another alternative that I came across more recently is the Parametric Component Tape Reel. Like my design, this design is done in www.openscad.org, and adjustable to any tape diameter.
See also
We also made a design for a smaller version of the JEDEC tray: the mini-tray. The conceptual idea is the same: a smaller version of the standard tray, and incorporating a few innovations for the occasion.
